Kafka源码解读之网络模型
前言
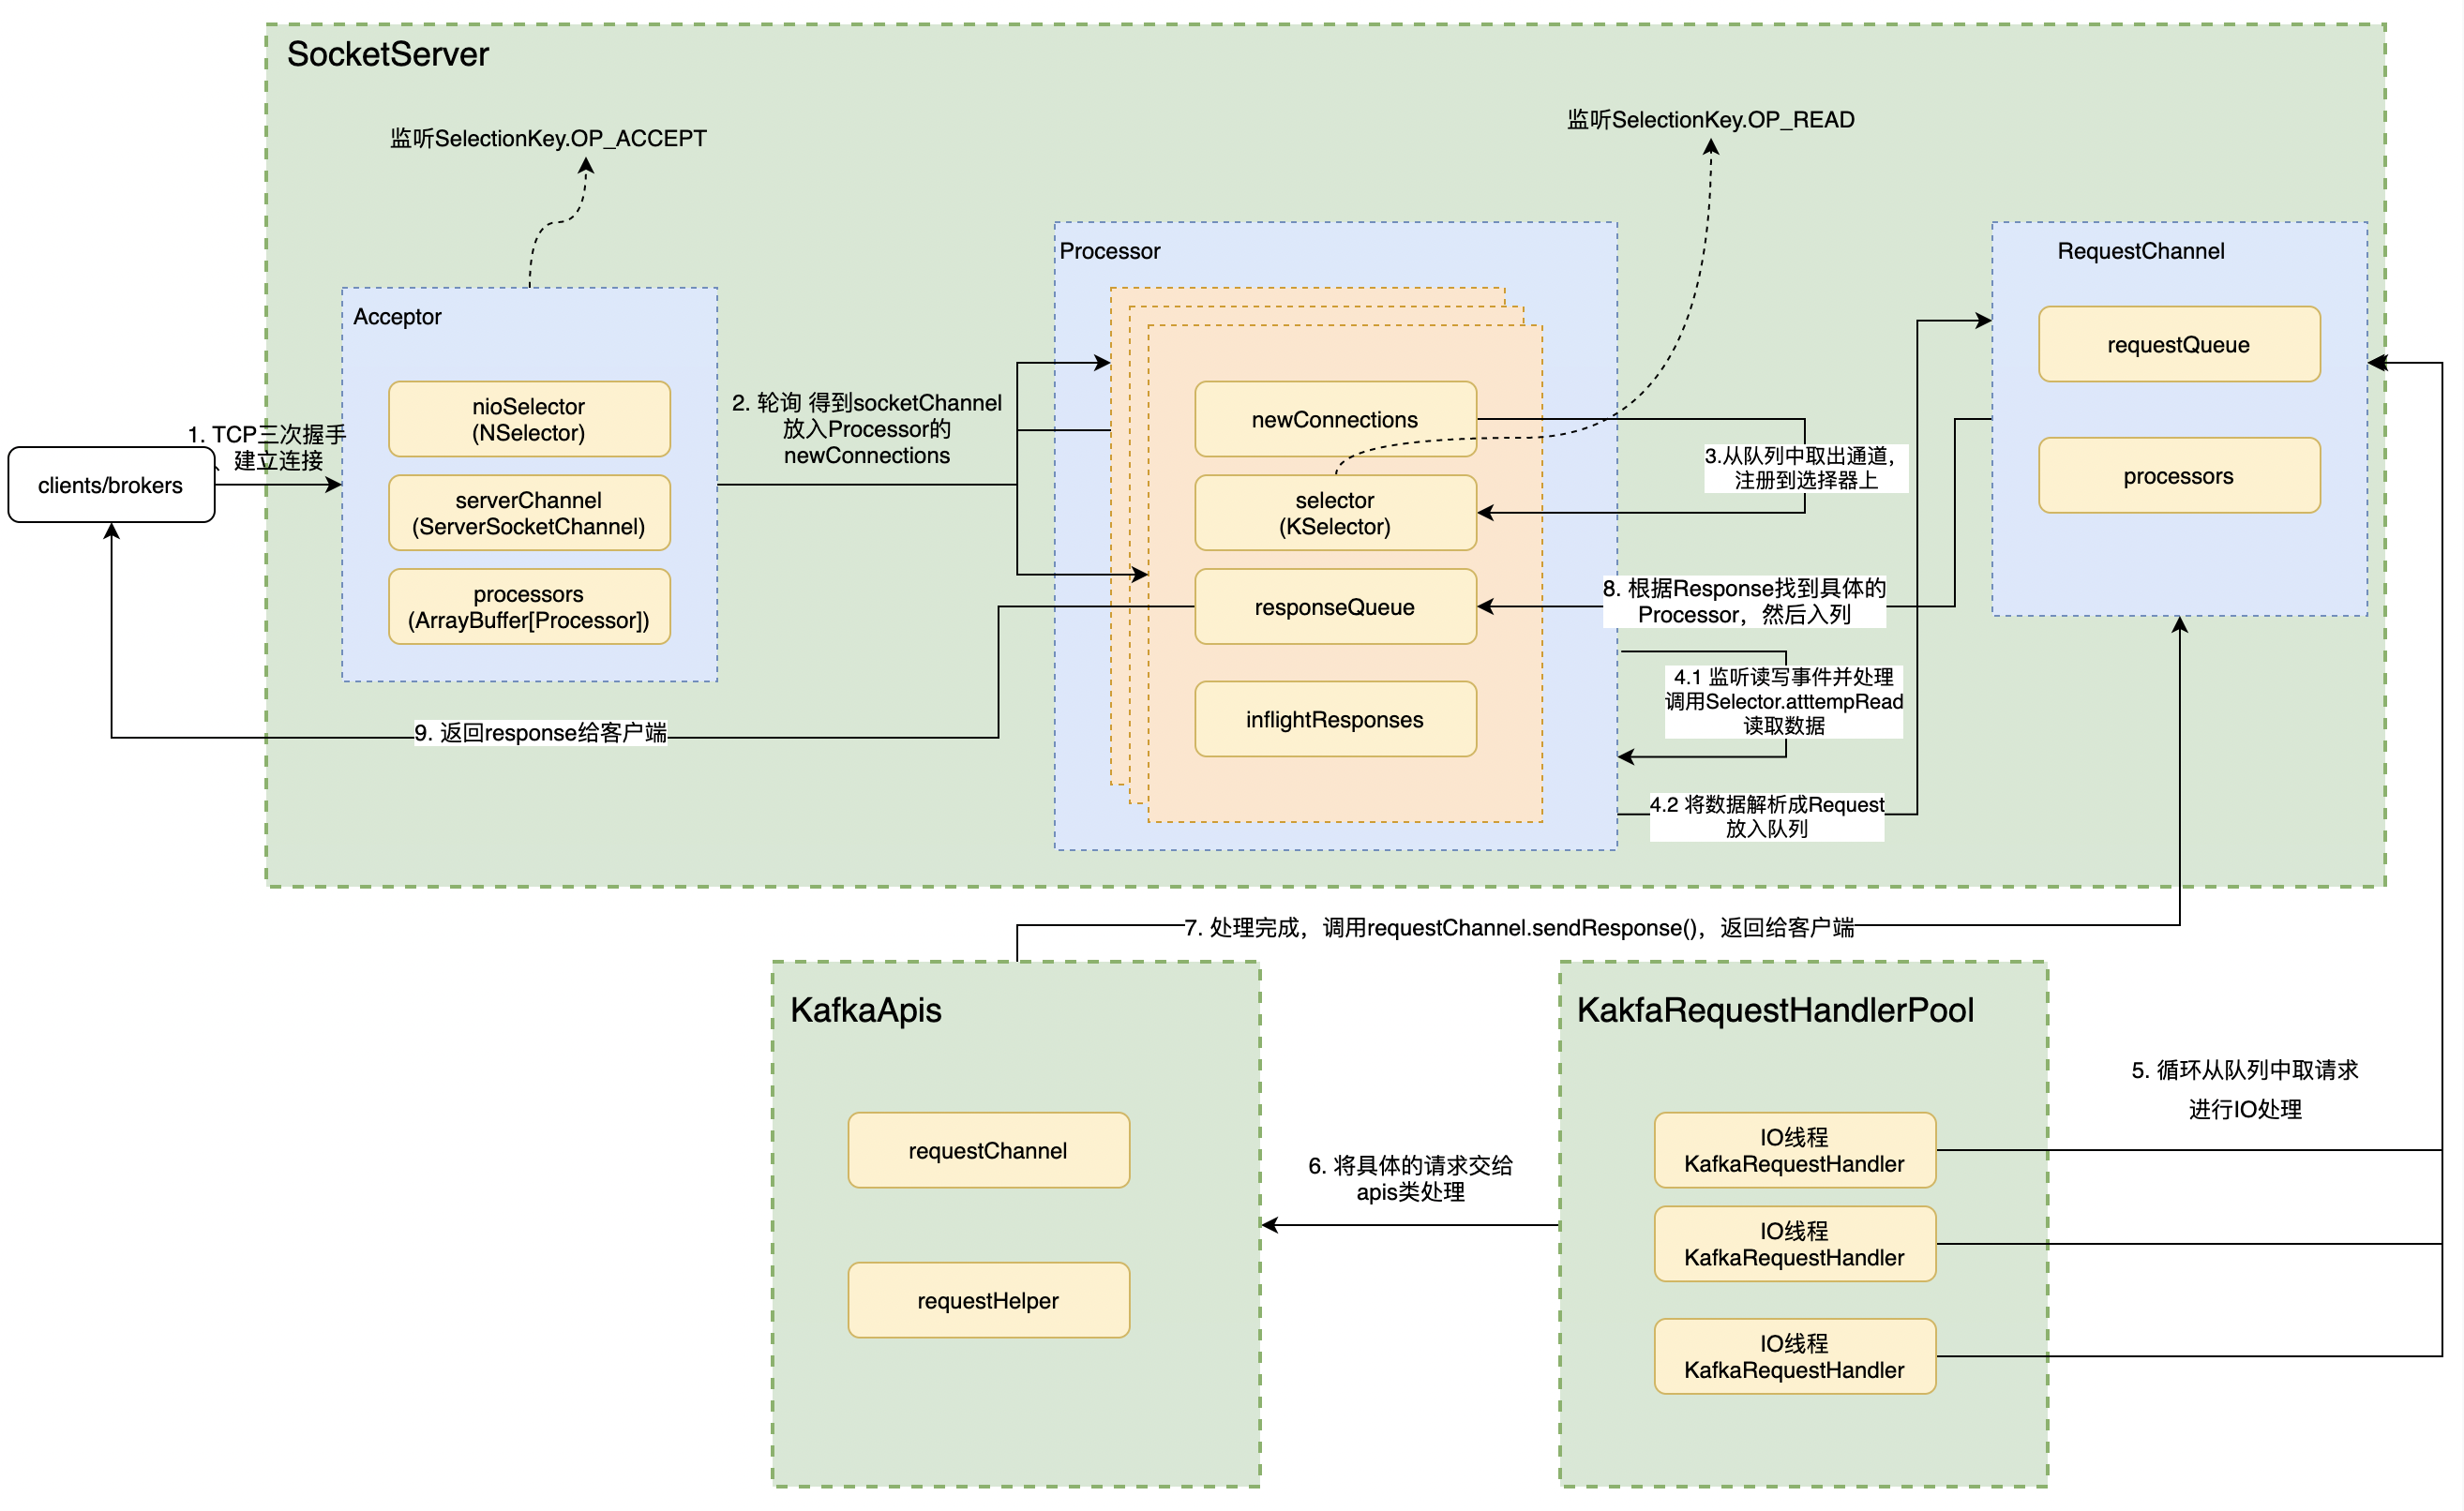
kafka网络模型是基于主从多Reactor模型进行设计的,在KafkaServer启动的时候,会调用SocketServer的startup函数,此函数分别会创建控制面和数据面的Acceptor和Processor实例,并通过listeners的配置来初始化。每个listeners对应一个Acceptor,而一个Acceptor又持有若干个Processor实例。
网络参数
首先,让我们初步了解下borker端配置参数,这些参数用于网络模型中Acceptor和Processor等实例的初始化。后续我们可以结合这些参数学习源码,了解网络模型中各个实例的具体实现。
| 属性 | 描述 | 默认 | 作用类 |
|---|---|---|---|
| max.connections.per.ip | 来自每个IP地址的最大连接数。如果达到的限制,则来自该IP地址的新链接将被丢弃。 | 2147483647 | ConnectionQuotas |
| max.connections .per.ip.overrides |
针对指定IP或者主机设置最大连接数, 可以配置多个,用逗号隔开。例如:“主机名:100,127.0.0.1:200” , 这个配置会覆盖 max.connections.per.ip配置 | ”“ | ConnectionQuotas |
| max.connections | Broker中的最大连接数, 当然也可以配置监听器级别的限制,使用方法是在配置前面加上前缀;例如:listener.name.具体的监听器名称.max.connections=xxx 。特别需要注意的是,就算Broker已经达到了最大连接数的限制了, 也应该允许 broker之间监听器上的连接, 这种情况下,将会关闭另外一个监听器上最近最少使用的连接。broker之间的监听器是配置inter.broker.listener.name 决定的 |
2147483647 | ConnectionQuotas |
| listeners | 监听器配置,可以配置多个,配置了几个就会创建几个Acceptor | listeners = PLAINTEXT://:9092 | Acceptor |
| socket.send.buffer.bytes | SocketServer的 SO_SNDBUF 缓冲区。如果值为 -1,将使用操作系统默认值。 | 102400(100 kibibytes) | Acceptor |
| socket.receive.buffer.bytes | SocketServer sockets 的SO_RCVBUF 缓冲区,如果值为 -1,将使用操作系统默认值 | 102400 (100 kibibytes) | Acceptor |
| num.network.threads | 单个Acceptor创建Processor处理器的线程个数 | 3 | Acceptor |
| socket.request.max.bytes | Socket请求中的最大字节数。 | 104857600(100 mebibytes) | Processor |
| connections.max.idle.ms | processor线程关闭空闲时间超过此值的连接 | 600000 (10 minutes) | Processor |
| connection.failed .authentication.delay.ms |
这是身份验证失败时连接关闭延迟的时间(以毫秒为单位)。这必须配置为小于 connections.max.idle.ms 以防止连接超时。 |
100 | Processor |
| queued.max.requests | 在阻塞网络线程之前,DataPlane允许的排队请求数 | 500 | RequestChannel |
| num.io.threads | 服务器用于处理请求的线程数,可能包括磁盘 I/O | 8 | KafkaRequestHandlerPool |
接下来让我们来查看Kafka源码具体实现。
网络链路
-
客户端向kafka服务端发送请求时,服务器端Acceptor 中的
nioSelector变量注册的是ServerSocketChannel通道,并监听OP_ACCEPT事件,它只负责 TCP 创建和连接,不包含读写数据// Acceptor.scala /** * Accept loop that checks for new connection attempts * Acceptor 线程使用 Java NIO 的 Selector + SocketChannel 的方式循环地轮询准备就绪的 I/O 事件。 * 这里的 I/O 事件,主要是指网络连接创建事件,即代码中的 SelectionKey.OP_ACCEPT。 * 一旦接收到外部连接请求,Acceptor 就会指定一个 Processor 线程, * 并将该请求交由它,让Acceptor来处理网络的读写 */ def run(): Unit = { // 将ServerSocketChannel通道注册到nioSelector 上,并关注事件SelectionKey.OP_ACCEPT serverChannel.register(nioSelector, SelectionKey.OP_ACCEPT) // 等待Acceptor线程启动完成 startupComplete() try { while (isRunning) { try { acceptNewConnections() closeThrottledConnections() } catch { ... } } } finally { ... } } private def acceptNewConnections(): Unit = { // 每500毫秒获取一次就绪I/O事件 val ready = nioSelector.select(500) // 如果有I/O事件准备就绪 if (ready > 0) { // 获取所有就绪通道 val keys = nioSelector.selectedKeys() val iter = keys.iterator() // 遍历所有就绪通道 while (iter.hasNext && isRunning) { try { val key = iter.next iter.remove() // 只处理Accept事件,其他的事件则抛出异常,ServerSocketChannel是 监听Tcp的链接通 if (key.isAcceptable) { // 调用accept方法创建Socket连接 // 根据Key拿到SocketChannle = serverSocketChannel.accept(),然后再遍历 accept(key).foreach { socketChannel => // 将socketChannel分配给我们的 processor来处理,如果有多个socketChannel 则按照轮训分配的原则 // 如果一个processor 中能够处理的newconnection 队列满了放不下了,则找下一个 // 如果所有的都放不下,则会一直循环直到有processor能够处理。 var retriesLeft = synchronized(processors.length) var processor: Processor = null do { retriesLeft -= 1 // 指定由哪个Processor线程进行处理 processor = synchronized { // adjust the index (if necessary) and retrieve the processor atomically for // correct behaviour in case the number of processors is reduced dynamically currentProcessorIndex = currentProcessorIndex % processors.length processors(currentProcessorIndex) } // 更新Processor线程序号 currentProcessorIndex += 1 } while (!assignNewConnection(socketChannel, processor, retriesLeft == 0)) } } else throw new IllegalStateException("Unrecognized key state for acceptor thread.") } catch { case e: Throwable => error("Error while accepting connection", e) } } } } private def accept(key: SelectionKey): Option[SocketChannel] = { val serverSocketChannel = key.channel().asInstanceOf[ServerSocketChannel] // 通过调用accpet()函数,来从内核获取客户端连接。如果没有客户端连接,会一直阻塞等待客户端连接。 // 客户端连接需要进行三次握手 val socketChannel = serverSocketChannel.accept() try { connectionQuotas.inc(endPoint.listenerName, socketChannel.socket.getInetAddress, blockedPercentMeter) // 设置为非阻塞模式 就可以在异步模式下调用connect(), read() 和write()了。 socketChannel.configureBlocking(false) socketChannel.socket().setTcpNoDelay(true) // 保持长连 socketChannel.socket().setKeepAlive(true) if (sendBufferSize != Selectable.USE_DEFAULT_BUFFER_SIZE) socketChannel.socket().setSendBufferSize(sendBufferSize) Some(socketChannel) } catch { ... } } -
当Acceptor监听到新的连接之后,就会通过调用
socketChannel = serverSocketChannel.accept()拿到SocketChannel,然后把SocketChannel保存在Processor里面的newConnections队列中// Acceptor.scala def accept(socketChannel: SocketChannel, mayBlock: Boolean, acceptorIdlePercentMeter: com.yammer.metrics.core.Meter): Boolean = { val accepted = { // socketchannel放入到队列中 if (newConnections.offer(socketChannel)) true else if (mayBlock) { val startNs = time.nanoseconds newConnections.put(socketChannel) acceptorIdlePercentMeter.mark(time.nanoseconds() - startNs) true } else false } // 如果newConnections队列放入了一个新的SocketChannel,则会调用一下对应Processor实例的wakeup()方法 if (accepted) wakeup() accepted } -
Processor会持续的从自己的
newConnections中poll数据,拿到SocketChannel之后,就把它注册到自己的Selector中,并且监听事件 OP_READ事件。// Processor.scala override def run(): Unit = { // 等待Processor线程启动完成 startupComplete() try { while (isRunning) { try { // 将之前监听到的TCP链接(暂时保存在newConnections中) // 开始注册监听OP_READ事件到每个Processor的 KSelector选择器中。 configureNewConnections() // 发送Response,并将Response放入到inflightResponses临时队列 processNewResponses() // 获取对应SocketChannel上准备就绪的I/O操作。 // 当此调用完成时,用户可以使用completedSends() 、 completedReceives() 、 connected() 、 disconnected()检查已完成的发送、接收、连接或断开连接。 poll() // 将接收到的Request放入Request队列 processCompletedReceives() // 为临时Response队列中的Response执行回调逻辑 processCompletedSends() // 处理因发送失败而导致的连接断开 processDisconnected() // 关闭超过配额限制部分的连接 closeExcessConnections() } catch { ... } } } finally { ... } } private def configureNewConnections(): Unit = { var connectionsProcessed = 0 while (connectionsProcessed < connectionQueueSize && !newConnections.isEmpty) { // 从队列中获取通道 val channel = newConnections.poll() try { debug(s"Processor $id listening to new connection from ${channel.socket.getRemoteSocketAddress}") // 将socketChannel通道注册到Selector 上,并关注事件SelectionKey.OP_READ selector.register(connectionId(channel.socket), channel) connectionsProcessed += 1 } catch { ... } } } -
如果监听到有新的
READ事件,则会读取数据,并且解析成Request,然后把Request放入到RequestChannel的requestQueue阻塞队列中。// Processor.scala // 接收和处理 Request private def processCompletedReceives(): Unit = { selector.completedReceives.forEach { receive => try { openOrClosingChannel(receive.source) match { case Some(channel) => val header = parseRequestHeader(receive.payload) if (header.apiKey == ApiKeys.SASL_HANDSHAKE && channel.maybeBeginServerReauthentication(receive, () => time.nanoseconds())) ... else { val nowNanos = time.nanoseconds() if (channel.serverAuthenticationSessionExpired(nowNanos)) { ... } else { val connectionId = receive.source val context = new RequestContext(header, connectionId, channel.socketAddress, channel.principal, listenerName, securityProtocol, channel.channelMetadataRegistry.clientInformation, isPrivilegedListener, channel.principalSerde) // 构建Request对象 val req = new RequestChannel.Request(processor = id, context = context, startTimeNanos = nowNanos, memoryPool, receive.payload, requestChannel.metrics, None) if (header.apiKey == ApiKeys.API_VERSIONS) { val apiVersionsRequest = req.body[ApiVersionsRequest] if (apiVersionsRequest.isValid) { channel.channelMetadataRegistry.registerClientInformation(new ClientInformation( apiVersionsRequest.data.clientSoftwareName, apiVersionsRequest.data.clientSoftwareVersion)) } } // Processor 从底层 Socket 通道不断读取已接收到的网络请求,然后转换成 Request 实例,并将其放入到 Request 队列. // 这个阻塞队列的大小为queued.max.requests默认500;表示的是在阻塞网络线程之前,数据平面允许的排队请求数 requestChannel.sendRequest(req) selector.mute(connectionId) handleChannelMuteEvent(connectionId, ChannelMuteEvent.REQUEST_RECEIVED) } } case None => ... } } catch { ... } } ... } -
KafkaRequestHandlerPool中创建了很多的IO线程KafkaRequestHandler(
num.io.threads(默认8)),它们从RequestChannel的requestQueue队列中poll新的Request进行处理// KafkaRequestHandler.scala def run(): Unit = { while (!stopped) { val startSelectTime = time.nanoseconds // 从队列中取出请求 val req = requestChannel.receiveRequest(300) val endTime = time.nanoseconds val idleTime = endTime - startSelectTime aggregateIdleMeter.mark(idleTime / totalHandlerThreads.get) req match { case RequestChannel.ShutdownRequest => ... case request: RequestChannel.Request => try { request.requestDequeueTimeNanos = endTime trace(s"Kafka request handler $id on broker $brokerId handling request $request") // 交由kafkaApis类处理 apis.handle(request) } catch { ... } finally { request.releaseBuffer() } case null => // continue } } shutdownComplete.countDown() } -
处理的具体路由交由KafkaApis类,当Request处理完毕后,会调用RequestChannel.sendResponse()函数返回Response
// KafkaApis.scala override def handle(request: RequestChannel.Request): Unit = { try { // 根据请求头部信息中的apiKey字段判断属于哪类请求 // 然后调用响应的handle***方法 // 如果新增RPC协议类型,则: // 1. 添加新的apiKey标识新请求类型 // 2. 添加新的case分支 // 3. 添加对应的handle***方法 request.header.apiKey match { case ApiKeys.PRODUCE => handleProduceRequest(request) case ApiKeys.FETCH => handleFetchRequest(request) ... } } catch { ... } finally { ... } } -
所有请求的Request和Response是一一对应关系,也就是Request如果是由某个Processor监听并处理的,那么Response也交由这个Processor来处理并返回
// RequestChannel.scala // 把 Response 对象发送出去,也就是将 Response 添加到 Response 队列的过程。 def sendResponse(response: RequestChannel.Response): Unit = { response match { // We should only send one of the following per request case _: SendResponse | _: NoOpResponse | _: CloseConnectionResponse => val request = response.request val timeNanos = time.nanoseconds() request.responseCompleteTimeNanos = timeNanos if (request.apiLocalCompleteTimeNanos == -1L) request.apiLocalCompleteTimeNanos = timeNanos // For a given request, these may happen in addition to one in the previous section, skip updating the metrics case _: StartThrottlingResponse | _: EndThrottlingResponse => () } // 每个Processor 线程都有一个唯一的id,通过ID找到对应processor val processor = processors.get(response.processor) // The processor may be null if it was shutdown. In this case, the connections // are closed, so the response is dropped. if (processor != null) { // 放入队列中 processor.enqueueResponse(response) } } -
Response的返回不是立即返回,而是先放到Processor的
resposeQueue队列中,然后异步调度返回给客户端protected[network] def sendResponse(response: RequestChannel.Response, responseSend: Send): Unit = { val connectionId = response.request.context.connectionId if (openOrClosingChannel(connectionId).isDefined) { // 发送Response selector.send(new NetworkSend(connectionId, responseSend)) // 将Response加入到inflightResponses队列} inflightResponses += (connectionId -> response) } }
数据面/控制面
数据面(DataPlane)是用来处理 Broker与Broker/Client之间的网络模型模块, 与之相对的是控制面(ControllerPlane)。**控制面(ControllerPlane)**是用来专门处理 Controller相关请求的独立通信模块。它们本质上处理的网络模型是一致的,只是因为Controller的请求优先级更高,如果业务线程隔离性不足导致数据命令会阻塞控制命令的请求,所有才有了这2个概念。
	// data-plane
	private val dataPlaneProcessors = new ConcurrentHashMap[Int, Processor]()
	private[network] val dataPlaneAcceptors = new ConcurrentHashMap[EndPoint, Acceptor]()
	val dataPlaneRequestChannel = new RequestChannel(maxQueuedRequests, DataPlaneMetricPrefix, time, apiVersionManager.newRequestMetrics)
	// control-plane(LeaderAndIsrRequest、StopReplicaRequest 和 UpdateMetadataReques)
	private var controlPlaneProcessorOpt: Option[Processor] = None
	private[network] var controlPlaneAcceptorOpt: Option[Acceptor] = None
	val controlPlaneRequestChannelOpt: Option[RequestChannel] = config.controlPlaneListenerName.map(_ =>
		new RequestChannel(20, ControlPlaneMetricPrefix, time, apiVersionManager.newRequestMetrics))
-
控制面 kafka集群内部的controller发送给Broker节点的命令,主要包含如下几个命令:
-
- LEADER_AND_ISR 分区Leader发生和ISR发生变化。
- STOP_REPLICA 停止复制。
- UPDATE_METADATA向从各个Broker同步元数据。
-
数据面 除上述3个命令之外的其他命令。
如果要启用控制面,必须配置control.plane.listener.name,并且这个监听器名称必须在listeners里面有配置。否则的话,是不会专用的控制器链接的EndPoint的。
例如Broker配置:
## 所有的监听器
isteners = INTERNAL://:9092, EXTERNAL://:9093, CONTROLLER://:9094
## 监听器对应的安全协议
listener.security.protocol.map = INTERNAL: PLAINTEXT, EXTERNAL:SSL, CONTROLLER:SSL
## 控制器
control.plane.listener.name = CONTROLLER
在启动时,代理将开始使用安全协议“SSL”监听“:9094”。在控制器端,当它通过 zookeeper 发现代理发布的端点时,它将使用 control.plane.listener.name 找到端点,它将用于建立与代理的连接。
注意事项:
- 必须配置
control.plane.listener.name才能使用独立的控制器面板- 控制器面板的RequestChannel中的
requestQueue不是由queued.max.requests控制的,而是写死的 20. 因为控制类请求不会有那么大的并发- 跟DataPlane相关隔离,互不影响。但是连接限流ConnectionQuotas是共享的,限流的时候,两个是算在一起的
- 控制类面板只有一个Acceptor和一个Processor,这个跟数据面板的区别是 DataPlane的Processor可以有多个。
小结
让我们再回想下主从多Reactor模型
- 主线程
mainReactor对象通过select监控建立连接事件,收到事件后Acceptor对象中的accpet获取连接,将新的已建立连接socket分配subReactor子线程 - 子线程中的
subReactor将mainReactor对象分配的连接加入selector进行继续监听,并创建一个Handler处理连接的响应事件
在kafka中,Acceptor就承担了主线程mainReactor职责,Processor承担了子线程subReactor职责,KafkaRequestHandler用来处理连接的响应事件。
所以,我们能看到技术都是相通的。不管是kakfa还是netty等技术它们的网络模型实现都是大同小异的。